Visual Arts Primer
Photography is one of the most accessible visual art formats. We can all point and
click a camera! But capturing your best shots requires some background
knowledge about composition and lighting. This brief primer will help you to
help your students know when and why one shot is better (more visually
appealing and exciting) than another, (Adapted from the book Digital
Photography, by Erica Sadun, Sybex 2001).
1. Composition
- Get CLOSER to your subject! When we shoot from too far away, our
photographs are too busy and cluttered. Choose the subject, and shoot
from no further than 4 or 5 feet away.
- For PORTRAITS, make sure you are quite close - so that the subject's
head and neck fill the whole photograph. The more you focus on a
person's face and eyes, the better the photograph will turn out.
- Use the RULE OF THIRDS. Many things that we find visually pleasing
follow the rule of thirds. Imagine that the photograph is divided into three
equal parts top to bottom and side to side.
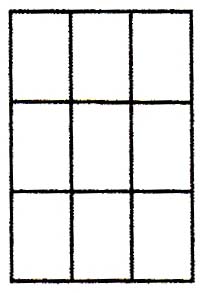 Photographs with a main feature placed about two-thirds or one-third from
the top of the photograph look better. For example, in a portrait shot, the
person's eyes should be approximately 2/3 from the top of the photograph.
In a landscape shot, the horizon should be at the 1/3 line.
Photographs with a main feature placed about two-thirds or one-third from
the top of the photograph look better. For example, in a portrait shot, the
person's eyes should be approximately 2/3 from the top of the photograph.
In a landscape shot, the horizon should be at the 1/3 line.
- SIMPLIFY THE BACKGROUND. A simple background requires the
viewer's eyes to do less work. Less work makes for a better photograph!
For example, avoid busy scenery, zoom closer, turn your camera ninety
degrees and shoot in portrait mode
 instead of landscape mode
  .
Make sure that the background elements do not distract from the subject.
.
Make sure that the background elements do not distract from the subject.
- HORIZONTAL shots are best with large group shots and landscapes.
- VERTICAL shots are best for portraits
- Think about the CAMERA ANGLE.
Upward angles make a landscape seem more open and large/ dramatic
(emphasize sky).
Upward angles for a portrait emphasize the chin of the
subject, and make people look more imposing.
Downward angles make photographs more closed. For landscapes,
downward angles can give a mood of enclosure and claustrophobia. For
portraits, downward angles make the subject seem smaller, younger, and
less imposing. Think about how often fashion models are shot from a
downward angle - this angle emphasizes the eyes and minimizes the chin.
When fashion models are to look "sweet" or "doelike", a downward shot is
used.